Tuesday, September 13, 2011

No name artwork...grrrrr...

Artwork without names quickly became a pet peeve of mine my first year teaching.  No matter how many times (or in how many ways) I asked/told/begged/demanded(!) that names be put on artwork there were always several unidentifiable papers collected at the end of Art class.  This turned the beginning of class on day 2 of a project into a zoo, made publishing to Artsonia impossible, and caused chaos on portfolio packing days!  I started putting "no namers" on the carpet in the front of the art room for kids to claim as I passed out projects.  This made the room a (bigger) mess and the kids never remembered where to look if their project was not passed back to them.  My solution?  A little rhyme I heard somewhere years ago...

Don't be a toad, write your name and class code!*

Now I have this guy hanging out on the drying rack:
And anyone who encounters a no namer puts the paper in the "Toad Box" that some of my second grade after school helpers made last year:

Now everyone knows where to look and the papers of the guilty parties are contained!  Thankfully, there are fewer and fewer no namers (probably because no one wants to be in the toad box! ha!)!

*Class codes have also been a giant time/sanity saver for me...they make sorting projects a piece of cake (which I appreciate SO MUCH while emptying the drying rack!)!  The class codes are the grade level and first letter of their homeroom teacher's name (so KD for Ms. Dauer's Kindergarten class, 5L for Mr. Lindstrom's fifth grade class).

Thursday, August 18, 2011

4 Years...of marriage and teaching Art!

Today is our fourth wedding anniversary and in a week and a half I get to start workshops for my fourth year teaching Art!  My husband has been with me through it all - He encourged me to change my undergrad major to Art in my junior year when I was second guessing myself. He picked me up from across campus at 2am so I wouldn't have to walk to my car alone after long nights in the studio printmaking and throwing on the wheel (or he'd stay with me and do his studying in the clay room or where ever I needed to be at those crazy hours!).  We got engaged at the end of our senior year of undergrad, shortly after I decided to apply for the Art Education masters program.  I started my teaching program 2 months before our wedding, began my practicum 2 days after our honeymoon ended, and student taught during a good portion of our first year of marriage. We spent our first anniversary mopping the floor and painting shelves in my first, very own classroom (with help from our amazing friend, Jen!).  He got to listen to me cry over dinner and a bottle of wine at the end of my first week in a school where I had been eaten alive by my 8th graders.

I am so thankful to have a husband who supports me 100% in my work, reminds me to take breaks for myself, and can always find a way to make me laugh no matter what kind of a day I have had.  He is truly phenomenal!

I have come a long way as a teacher in the last 3 years (I no longer get eaten alive by my middle schoolers, for example) and am looking forward to a new year at my school with a new principal and new teachers in grades K, 3, 4, 6, 7, and 8!  Although I am sad to see my outstanding (very supportive of the Arts) principal and several terrific teachers move on to their new jobs, I am excited about the fresh ideas and energy that will come to our school with the new faces.  It should be an adventure!


In year 4, I hope to share more about my classroom management techniques with you in addition to the project posts (my intention was not to be solely a project poster but that is all I have done so far! Oops!).

I will leave you with some images from my bachelorette party 4 years ago (it was very tasteful, so don't be worried!).  My super creative maid of honor, Rose, threw an art and color themed party for me (this girl would be an unbelievable event/party planner - let me tell you!) and one of the games was to create an original image of me with my groom-to-be based on Gustav Klimt's "The Kiss."  They crack me up...especially because of the weird pictures of us she chose to use for them! 


I have since done a similar project with my 6th graders using magazine pictures and scratchboard (but that will have to wait for another time!).  Enjoy!


Monday, May 30, 2011

Don't Let the Pigeon...

Many of my art lessons are inspired by children's picture books and Mo Willems is one of my favorite current children's authors!  I remember the first time I saw his book Don't Let the Pigeon Drive the Bus! I couldn't stop laughing as I read the story and admired Willems' expressive illustrations (I was a library clerk still in college earning my Art degree back then!).  I even checked it out so I could bring it home and read it to my family.  Most of them were less impressed than I, but luckily my first graders always share my enthusiasm for these silly books!


Day one we read the book Don't Let the Pigeon Drive the Bus! and then drew our own pigeons with black crayon following Mo Willems' directions from his Let's Draw the Pigeon! handout (just Google "Let's Draw the Pigeon! and it should pop right up).  This year, we colored with crayons so we could immediately cut out our cute pigeons, but I've also done this lesson using oil pastel and tempera to make the pigeons.  I asked all of the first graders to finish the sentence "Don't let the Pigeon..." with a rule or expectation from Art or Music class.  As they were coloring and cutting, I buzzed around the room to record their sentences. 


Day two we started by reading Don't Let the Pigeon Stay Up Late! and then talked about Mo Willems' use of word bubbles in his illustrations.  I had typed out their sentences from the previous class and they cut them out in the shape of a word bubble.  Finally, they assembled their pigeon and word bubble on construction paper using glue stick and drew their pigeon legs using black crayon.  Because I knew the book and collage assembly wouldn't take up all of our 40 minutes together, I showed the kids how to make a simple 8 page book using a standard sheet of printer paper and then they wrote their own mini "Don't Let the Pigeon..." stories.  I wish I had a picture of some of their books to share with you, but the first graders were so excited about them that they all took them home at the end of class!  The first grade teachers told me that the pigeon has made appearances in many of the first grade anything journals, on the backs of tests, and in the margins of assignments!


Wednesday, May 25, 2011

Eeek!


I missed making a post last week and am going to try to get back on track!  Things have been busy inside and outside of the Art room...we had our annual school auction a couple of weeks ago (the theme this year was Masquerade...see the felt bird mask I made to wear to the event!) and I donated 2 "Teacher Treasures" with other teachers in the school.


The first treasure I did was a basketry class with the school Librarian.  She is an expert basket weaver and is really fun to teach with!  We set the limit for the class at 5 students so that we can give lots of individual attention.  This year we had 2 second graders, 1 third grader, and 2 fifth graders (all girls) and they did a great job!  We gathered in the Art room after school and I had the girls wash the tables with shaving cream (fun and it gets all of the gunk from oil pastels and glue off of the table in no time!) while I got the water basins for soaking the reeds ready.  The Librarian brought all of the reeds and tools (and her expertise) and guided the class from measuring and cutting their own reeds all the way through finishing their rims.  Very impressive!  To make a beginner basket it takes about 3 hours and all of the girls ended the class with a unique basket to take home!  The picture you see is the third grader weaving.  She was so thrilled with the beautiful, hand dyed reed that our Librarian brought.  She decided to use red, orange, yellow, green, blue and purple (in rainbow order of course)!


For the second treasure, I always team up with one of our awesome first grade teachers and take 4 first graders out to lunch and to a performance at the Children's Theater (we have a great family at our school who donates the tickets and even lets us use their car [which has all of the necessary booster seats] to cart the excited kids around).  This year we enjoyed Annie.  Now that the teacher treasures are over with I hope I will have more time!


Here is one more non-art-room project that I have been working on!  My husband's cousin just had her first baby (a girl!) and I used freezer paper stenciling to make her a custom onesie (it is hard to tell in the photo, but I mixed the screen printing ink to match the green from the super cute BabyLegs I bought for her).  Freezer paper stenciling has become a new hobby of mine - it is so fun!  If you have never tried it, I highly recommend it! 

Please stay tuned for more art projects from the Art room!  I'll try to do a better job with posting consistently!

Wednesday, May 11, 2011

Frank Stella

I needed a project that would get my eighth graders excited to be in art again (I hadn't had this group for over a year and now I have them during their LAST TRIMESTER AT THE SCHOOL! IN THE SPRING...hormones are running rampant and many brains are on vacation already, to say the least!) and have wanted to try a project inspired by Frank Stella...so here it is!


To make these 3D paintings, low-relief paper sculptures...or whatever you want to call them, we started by spending 2 days making painted paper using tempera on drawing paper, thin cardboard and corrugated cardboard.  This was my hook - low stress, high success, and oh-so-messy painting!  Each student painted at least 3 pieces of 12 x 18" paper, one cereal box (thank you to my Mom, sisters, and many teachers at school for collecting boxes for me!), and one rectangle of corrugated cardboard (the corrugated cardboard is what we used as the "base" or "canvas" that we later built upon).


Next, we did A LOT of cutting.  I had some sets of French curves (Stella is known for having derived his forms from cones, pillars, French curves, waves and decorative architectural elements for some of his works in the 1980s) that the eighth graders traced and they also cut out some of their own shapes.


Before constructing, we watched a short video of Stella talking about his process and viewed images of some of his works.  For our projects, we did it backwards (we painted THEN cut our shapes instead of making what we wanted to paint on first as Stella does) but I still thought it was valuable for them to hear the artist talk about his work.  To put all of the pieces together, we used thin strips of cereal box cardboard folded into accordions and hot glue.  To quell my fears and protect fingers, each glue station also had a pair of inexpensive garden gloves for the kids to wear.


The eighth graders did a beautiful job and our school community was enthusiastic about seeing some abstract work on display!  They've been up for several weeks now and I still see kids, parents and teachers checking them out everyday! 

Wednesday, May 4, 2011

Oil Pastel Butterflies

Third graders got in the mood for spring when they drew these colorful oil pastel butterflies.  This lesson was inspired by Patty of Deep Space Sparkle and her fabulous watercolor butterflies.  We started by folding a 12 x 18" piece of white sulphite drawing paper hamburger style (or taco style as we call it in the Art room!).  The artists unfolded their papers and then, using a black oil pastel, drew HALF of their butterfly's body starting and ending on one side of the fold.  Working on the same side of the fold as the body was just drawn, they drew one of the butterfly wings and added designs (I challenged them to have a minimum of 6 shapes/spaces decorating their wings).  


Then they re-folded their papers, with the oil pastel drawings on the inside, and rubbed over the lines using a craft stick.  When unfolded, voilĂ , their drawings were transferred to the other side of their paper!  They outlined the transferred drawings and then set to work coloring their designs symmetrically. 
I love how the black pastel from the outlining smudges in with the colored areas!  Enjoy!


Friday, April 29, 2011

Red + Yellow = Orange!

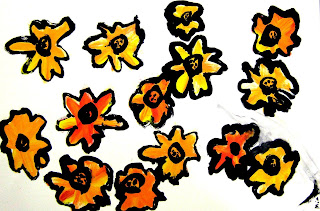
I saw this idea on one of my favorite blogs, Art Project Girl, and had so much fun doing it with my Kindergarten classes!  Here is a link to Art Project Girl's post: Easy Project You Can Do Tomorrow.  The kinders loved making their bright flowers as they practiced double loading their paintbrushes with red and yellow paint to make different orange hues.  They also practiced thick lines, thin lines and outlining. 


Aren't they just lovely?  Thank you, Art Project Girl!

Thursday, April 28, 2011

Charcoal and Pastel Owls

A few weeks ago I was lucky enough to have 2 bonus class periods with my 6th graders while my current middle school group (8th grade) was in Washington, D.C. for the annual 7th/8th grade travel week.  Because I hadn't had my 6's in a couple of months, and I only had a little over 1 hour of usable art making time with them, I knew I needed a project that would get them excited and keep them on task so that we would have finished pieces of art at the end of our time together.  I decided that something BIG and a little bit messy would be right up their alley.  For whatever reason, kids have a very high success rate with bird images (and cats, too!) so I decided we would draw owls and focus on drawing big, using lots of visual texture, and variation in value (lights and darks).


To help the kids dive right in, I had some owl images available for them to look at (photocopied from Animals: 1,419 Copyright-Free Illustrations).  They worked in charcoal on 19 x 25" tagboard that I had cut down from larger (25 x 38") pieces that I found in the paper room.  To make their work really pop, they selected an area or two (usually the eyes, background or beak) to add color to using chalk pastels.  The results were stunning and several are proudly on display in the lunchroom for all to enjoy!


Hello world!

Hi!  For those of you who know me in real life the title of my blog might seem weird, because you have never called me MJ!  This is what most of my students call me now.  It is "Mrs. J" in an even shorter, kid-logic form.  And, according to my spunky 4th graders, it is fitting because I rank right up there with 2 other (slightly more famous) MJ's: Michael Jordan and Michael Jackson!  Ha!

For those of you getting to know me through this blog, I am a 3rd year, K-8 Visual Arts teacher in Minnesota.  I have about 360 students and get to see my K-5 classes twice a week for 40 minutes each period.  Middle schoolers (grades 6-8) have my class for one trimester, 30 minutes every other day.  My classroom is in the school basement right across the hall from the Music room and right next to the cafeteria.  Because of this, and because they are just phenomenal people, the Music teacher and head of the school's hot lunch program have become some of my biggest supporters and best givers of advice (in addition to my patient and understanding husband who gets to hear all the trials and triumphs of each day when he gets home!).  I also work with a whole crew of awesome teachers and the best staff I could wish for here!

Without trying to sound like too much of a Pollyanna, I really think I have one of the best jobs in the world!  My goal for this blog is to share some of my classroom management techniques, organization systems (which are still being developed - there are so many supplies in an Art room and SO MUCH PAPER!), favorite projects, as well as some things about the rest of my life (some of my younger students think I sleep on a cot in my coatroom but I do (try to) have a life outside of teaching art)!  It is not all sunshine and lollipops, though, and you'll probably get to read about some of my bad days on here, too!